On my online workbook this week: Stick it out… the creative spirit version
Dear
This week's inspiration is working right on the very edge.
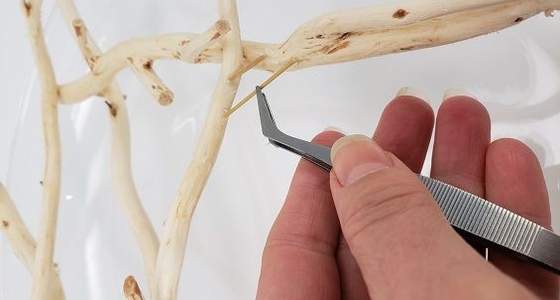
My tip for you this week is something to add to your toolbox, if you have not already... tweezers! Oh yes, it has come to this. Designing with tweezers.
But it really makes a huge difference when placing something delicate especially when using hot glue. Even the shortest of stems, with glue on both ends, can be accurately placed… with the added benefit of not burning your fingers with the hot glue… and smudging the glue all over the design as you try to position it in the exact place in a tight corner.
Measure the reed you want to place. Cut it to the exact size. Grasp it in the middle with the tweezers and squeeze two tiny drops of hot glue on either side. Position the reed in your design with the tweezers. Hold it in place for a few seconds. As easy as that!
Book readers: turn to page 17 for an updated list of things I always keep in my tool bag and where I explain how to judge what exactly is "the best" tool you can add to your toolbox and then to page 19 for pictures of the three tweezers I have in my toolbox.
Enjoy!
Every good wish,
Christine
Happy Canadian Thanksgiving week, everyone.