On my online workbook this week: Fascinating!
Dear
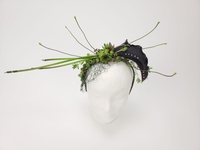
This week's inspiration is getting a bit of help from the pollinators in my balcony garden to make my design unique. This year they discovered my blueberry flowers a little too late. It is a step up from last year when they did not visit at all. But this left me with half the bush covered in ripening berries and half of the flowers unpollinated. But how lovely the unpollinated receptacle looks in the design!
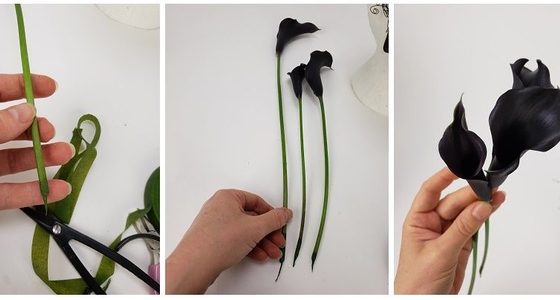
My tip for you this week is all about the elegant calla lily stems. With a little bit of care you can seal the stem ends and the flowers will remain beautiful without a water source for at least 24 hours if not more. Mine is now at 72 hours standing pretty… showing no signs of stress just like in the design pictures!
Start your design with the careful and creative choice of your flowers. Your calla lily should be the exact shape you need for the design. Match them together to make the perfect design match. The flowers will not continue to open once cut. Also make sure the stem is firm and pliable. If the stem snaps when curved it is already past its prime. The flowers should be smooth without any wrinkles and no visible pollen.
Now that you have the exact flowers matched up for the fascinator… the rest of your focus is on the cut stem ends. If they do not have the white part of the cut stem still attached they might split during conditioning so make sure the stems you choose are long enough to be re-cut for your design.
Next step is to condition your calla lilies for two hours to make sure they are well hydrated.
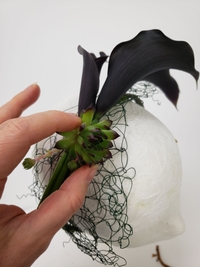
Our next step after that is to focus on sealing the stem ends. The sap stains… everything! And the stain becomes even more visible after washing. There are a few ways to seal the stem ends. I have heard tips of using clear nail varnish, candle wax, latex and clear plastic wrap. You can even use a water proof tape and ribbon and you might even know a few more tricks. For me florist tape works perfectly and you can air tape a bit of a decorative “something” to the stem end if you choose. Or use florist tape and then wrap in ribbon.
For this design I wanted my stems to stand straight to the side to add a bit of diva drama but you can of course curve or wire the stems to create angles. You can find Tutorials for those techniques below the post.
… and if you want to make the flowers in advance… or for a competition or wedding design where you do not want to take any chances you can always use my secret water source trick. Turn to page 303 of my book to have a look. Works every time!
Enjoy!
Every good wish,
Christine